728x90
반응형
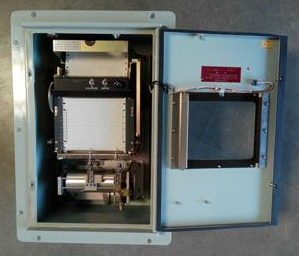
1. COURSE RECORDER?
- The course recorder automatically records the course of the ship on recording paper. The ship’s course is sent into the ship’s course recorder from the master compass of the ship.
- The recording paper has a time scale. It is driven by a paper feed motor.
- When the voyage is completed, remove the recording paper and file it for reference.
- This recorder, together with the record of the log, serves as an effective record of a voyage with many variations.
2. OPERATION OF COURSE RECORDER
1) STARTING
- When necessary, attach a new roll of recording paper.
- Lower the pen with the pen raise knob.
- Be sure to match the time of the recording paper to the ship’s time.
- To match the two times, turn the power switch to OFF, until the time on the recording paper comes to the right point, slowly turn the chart adjusting gear toward the operator, taking care not to let the recording paper slacken. Then, turn on the power switch.
- To turn the course pen and master compass, after turning off the repeater switch, slowly turn the indication turning gear to bring the zone pen in the same quadrant as ship’s course and, at the same time, match the course pen to the proper course on the recording paper. If the recorder is not turned with the master compass, the course is recorded with a definite error.
- With the above operations, the course recorder attains the recording condition. However, confirm that the recording paper is properly set on the pins of the paper feed drums and that the recording paper which has been fed is properly folded.
2) STOPPING
- Since repeater motor stops when the power supply of the master compass is turned off, turn off the repeater switch to stop the recorder.
- Turn the power switch to OFF.
- Raise the pen with the pen- raise knob.
3) HOW TO REMOVE RECORDING PAPER?
- When removing the recording paper, turn all switches to OFF, raise the pen. Slowly turn the chart adjusting gear toward the operator until the remaining recording paper is fed. Then, remove the recording paper.
- To remove a partially recorded recording paper, cut the paper. Turn the chart adjusting gear to feed out the paper and then take it out.
4) HOW TO ATTACH RECORDING PAPER?
- Open the paper holders to both sides. Open the base plate toward the operator and place the recording paper in the chart receiving box.
- Let the paper pass between the rollers located on this side of the upper feed drum and let the paper pass over the upper feed drum from the rear to the front.
- Fit the holes of the two edges of the paper uniformly on the pins of the feed drum and be sure to attach the four lines which indicate quadrants so that they come on the left side. At this time, the pen should be up.
- After sufficiently pulling out the paper so that the feed drum turns smoothly, close the base plate. Insert the paper in the lower feed drum from the operator’s side toward the inner side. When the pins of the feed drum are in the holes of the recording paper, feed out the paper by slowly turning the chart adjusting gear toward the operator. When the recording paper on the base plate shows no slack, press the paper with the paper holders at the two sides. This completes the attaching of the recording paper.
5) HOW TO READ RECORDS?
- The recording paper is divided into two parts. The four vertical lines of the left side are for the zone pen which indicated the quadrants of the ship’s course. The other part of the recording paper is for the course pen which indicated the ship’s course.
- The horizontal lines on the recording paper indicate time and are drawn every ten minutes. The time is indicated on the right side of the recording paper.
- The line scribed by the zone pen indicates the quadrants of the ship’s course. The line scribed by the course pen indicates the ship’s course. When the numeral indicating the bearing with respect to the quadrant belonging to the ship is read from the position of the course pen along the vertical line on the recording paper, the numeral indicates the course of the ship.
- To use the remaining chart after removing the partially recorded paper, cut off the angle of the cut section of the chart about 5cm when putting it into the lower feed wheel.
- Be sure to read the azimuth scale from left to right in the cases of the first and third quadrants and in the case of the second and fourth quadrants, read the azimuth scale from right to left.
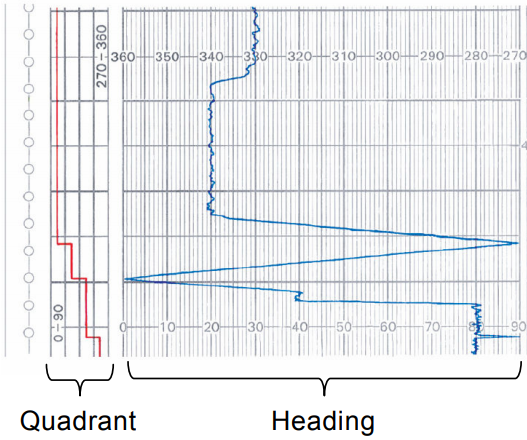
6) HOW TO USE VERNIER SCALE?
- A vernier scale is provided at the right side of the paper chart to facilitate reading the chart to 1 minute intervals of time. To use the vernier, observe which line on the vernier scale is aligned with a horizontal line on the chart. Use this figure as a minute digit and add the indicated numner of minutes to the time stamped on the chart, at the right of the section the COURSE PEN is on. Suppose the COURSE PEN is at a position between the horizontal lines designated 20 and 30 at the right, and that the hour beneath these designation is 5pm. Now suppose line #6 on the vernier scale is aligned with a chart line. The indicated time at the pen position then is 5:26 PM.
- The vernier scale may be used to start the record at any particular time. Hence, if the desired time of start is 5:26 PM, that particular section of the paper which bears the designated time is brought under the pens, and the feed roller clutch is engaged as previously described.
3. MAINTENANCE OF COURSE RECORDER
1) GENERAL
Except for checks, course recorder does not require any maintenance.
2) CHECKS
It is necessary to check the recording conditions daily.
- Make sure that the ship’s course, course pen and zone pen are turned completely.
- Make sure that the time on the recording paper and the ship’s time match.
- Make sure that the recording paper is being fed in the proper condition.
3) ADJUSTMENT
- Since each of the zone and course pens is attached by a pen mounting screw, if the time of each does not match, loosen the mounting screw and then each can be matched to the 0 position of the vernier scale.
- Each of the zone, course and rudder angle pen is fixed by its holder; loosen the two screws of this holder for parallel movements.
- When the line scribed by any pen is not clear, the pen point has become round or the spring is weakened. In the former case, replace the pen. In the later case, insert the plain washer with a thickness of 0.5mm – 1.0mm in the screw located below the two locking screws of the pen holder to increase the force of the spring.
CAUTION: A suitable force of the spring is 60gr +/- 12gr as measured at the bending section of the pen. No optimum recording is possible when the force of the spring is greater or smaller than the value given above.
728x90
반응형


댓글